Program Configuration
Last updated: 2022 May 24
- Node: Update
- Eagle: Create desktop entry
- JetBrains IDEs: Installation
- Matlab: Force nice SVGs
- Nautilus: Remote file access with SSH/FTP/SFTP
- Spotify Themes with Spicetify CLI
- Logitech mouse gesture buttons with Solaar
- Make PrusaSlicer default for 3MF files
Node: Update
Ubuntu comes with an old version of Node.js and it’s a pain in the ass to update and make it use the updated version. Node version manager (nvm) worked for me.
Install nvm:
curl -o- https://raw.githubusercontent.com/creationix/nvm/v0.33.2/install.sh | bash
In a node terminal/tab, list Node versions:
nvm ls-remote
Install one of the versions, e.g.:
nvm install v10.9.0
Check that it’s now using the new version:
node -v
Source: Ask Ubuntu
Eagle: Create desktop entry
Eagle is self-contained to a folder when you download and unpack, which is convenient for some things. But mostly not. I want to be able to open it like any other program.
Unpack the downloaded tar.gz file to ~/.local/share/Eagle/. You should now have a subfolder named something like eagle-<version>/
Create a file called eagle.desktop in ~/.local/share/applications/ containing the following:
[Desktop Entry]
Name=Eagle
Type=Application
Exec=/home/<username>/.local/share/Eagle/eagle-<version>/eagle
Terminal=false
Icon=/home/<username>/.local/share/Eagle/eagle-<version>/bin/eagle-logo.png
Version=<version>
Categories=Development
Where <version> is the Eagle version number (like 8.6.3) and <username> is your username. If you’re using a theme that has an icon for Eagle, you can replace the Icon value with the name given to that icon. (For example, with the Papirus icons, just make this Icon=eagle.)
Whenever you get a new version of Eagle, you’ll have to update the version number in this .desktop file to point to the right location.
JetBrains IDEs: Installation
Installing
JetBrains makes nice IDEs for a bunch of languages (for us mere mortals who don’t use vim or emacs). But they don’t make installing on Linux super easy. Here’s how I do it.
- Download the relevant program and version from the JetBrains website (it’s a
.tar.gzfile) - Extract the folder inside to
~/.local/share/JetBrains/ cdinto the bin folder:~/.local/share/JetBrains/<program>-<version>/bin- Run the launch script from the command line (something like
./pycharm.sh) - When the program opens, click Tools > Create Desktop Entry. You can either make it user-specific or global.
Updating
If you’re installing an update, follow the same steps. Creating a new desktop entry should overwrite the old one, but probably differs by distro need to restart your session for it to take effect. (For me in Gnome, that’s Alt+F2, then r). Also note that if you have a user-specific desktop entry, that will take precedence over a system-wide one.
Changing the Icon
By default, the created desktop file will use the icon in the installation folder. That means it will probably ignore an icon set by a theme (if you’re using one). You’ll have to do this after you create a new desktop file from updates as well.
- Open the desktop file (probably
~/.local/share/applications/jetbrains-<program>.desktopfor user-specific or/usr/local/share/applications/jetbrains-<program>.desktopfor system-wide) - In the line that says
Icon=change it to just the program name – e.g.,Icon=pycharmand restart your session.
Matlab: Force nice SVGs
Sometimes Matlab decides that the figure you’re trying to export is too complicated for proper SVG exporting. When you go to export the figure with saveas, it creates an SVG with embedded images instead of vector graphics. (This is all in Matlab 2014b and later, with its new graphics system.) After digging through Google results and documentation, there is a solution to force it to export as a vector image (from the saveas documentation):
Set the renderer for your figure to 'painter':
fig = figure;
fig.Renderer = 'painter';
Then save the figure as normal:
saveas(fig, 'my_figure.svg');
And you’ll have a proper vector plot.
Nautilus: Remote file access with SSH/FTP/SFTP
Sometimes it’s useful to be able to actually see the files that you are accessing remotely. So, instead of just using ssh in the command line, it’s useful to have a GUI. Instead of installing extra programs, though, you can just do it directly from within your file browser in Linux.
In the Nautilus file manager just enter into the location bar (you might have to hit Ctrl+L to edit it):
ssh://username@host
Or whatever your preferred accessing method is (ssh, stfp, ftp). (Also useful to remember: the change the location bar from buttons to a text field, hit Ctrl+L.)
The remote directory is then mounted and appears on the left side bar. It will stay mounted even if you close Nautilus, and you just have to click on it to re-open it. To unmount, just click the arrow next to it in the panel (like unmounting/ejecting a drive/disk).
Spotify Themes with Spicetify CLI
Someone made a program that lets you add themes and extensions to Spotify. The Linux version only has a command line version, hence Spicetify CLI.
Installation
- Download the latest release (the Linux tar file)
- Make a folder and extract the tar file to it:
mkdir ~/spicetify
tar xzf ~/Downloads/spicetify-x.x.x-linux-amd64.tar.gz -C ~/spicetify
(filling in
x.x.xwith the version number you just downloaded) - Make spicetify runnable from anywhere by your user:
ln -s ~/spicetify/spicetify ~/bin/spicetify(This requires that you have
~/binas part of your PATH, as set up here)
Setup/Testing
- Generate a config file:
spicetify - When you get the above working with no errors, run:
spicetify backup apply enable-devtoolTo get this to work, I needed to give write permissions to the Spotify install location: (This is the install location in my Ubuntu/Pop system; probably differs by distro)
sudo chmod 777 /usr/share/spotify -R - Update Spotify with whatever changes you make:
spicetify update
Themes
There’s a whole repository of community-created themes for Spicetify
- Clone the
spicetify-themesrepository to Spicetify’s Themes folder:git clone git@github.com:morpheusthewhite/spicetify-themes.git ~/.config/spicetify/Themes(Note that the Themes folder location varies by OS)
- Change the theme:
spicetify config current_theme THEME_NAMEwhere
THEME_NAMEis one of the options in the Themes preview - Apply the change and launch Spotify:
spicetify apply
There are also Spicetify extensions, but I haven’t tried any of those yet.
Logitech mouse gesture buttons with Solaar
Within the Solaar GUI, select the mouse (I’m using the MX Master 3) and click the “Rule Editor” button. In the “User-defined rules” section, right click and select “Insert new rule.”
From here, I created a sub-rule for each gesture direction. Right click on “[empty]” within the Rule and select “Insert here” > “Sub-rule.”
Right click on “[empty]” within the Sub-rule and select “Insert here” > “Condition” > “Mouse Gesture.” At the bottom of the window, begin typing the direction of the gesture, and it should autocomplete – for example “Mouse Up.” That’s all you need for the condition.
Now right click the “Mouse Gesture” condition and select “Insert below” > “Action” > “Key press.” At the bottom of the window, start typing the relevant key you want it to execute. You can also use “Add key” to add additional keys to the key combo you want to execute. For example I have “Super” + “W” set to move up a workspace.
Here’s what my configuration looks like for four gesture directions, plus reassigning the button underneath the scroll wheel.
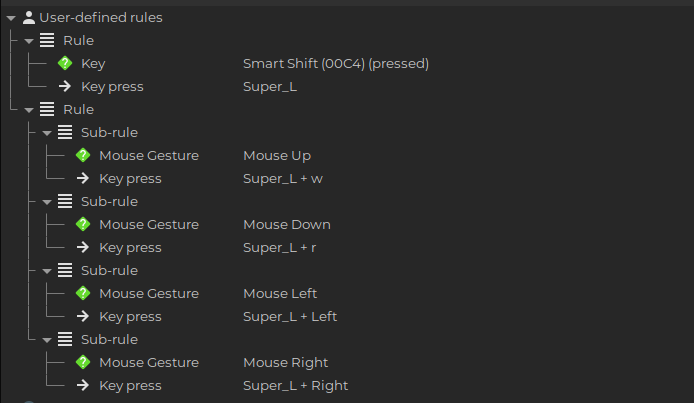
Source: Solaar documentation
Make PrusaSlicer default for 3MF files
3MF is a compressed archive file format that (by default) Linux won’t distinguish from files like zip and tarball files. So if you just change 3MF files to open with PrusaSlicer, it will also change the default program for those others. To fix this, we need to tell get Linux to distinguish them with a new MIME type.
- Make a file named
~/.local/share/mime/packages/application-x-3mf.xml - Copy and paste this into the file:
<?xml version="1.0" encoding="UTF-8"?> <mime-info xmlns="http://www.freedesktop.org/standards/shared-mime-info"> <mime-type type="application/x-3mf"> <comment>3D Manufacturing Format</comment> <icon name="application-x-3mf"/> <glob-deleteall/> <glob pattern="*.3mf"/> </mime-type> </mime-info> - Update to use this new MIME type:
update-mime-database ~/.local/share/mime
Now, you should be able to right click a 3MF file and set the default application to PrusaSlicer.
Note: The original instructions suggest adding the following line to ~/.config/mimeapps.list: [Added Associations] section: application/x-3mf=prusa-slicer.desktop. However, this doesn’t seem to work when the .desktop file using AppImageLauncher, so I find it easier to right click and set the default manually.
Source: Prusa Forums, Ubuntu